Before you start
DecorViz Storefront detects supported product pages, reads the product image, and adds a room-preview button. Shoppers open the widget, upload a room photo, and generate a preview without creating a DecorViz account.
- A live WooCommerce store with clear product photos.
- A DecorViz account with access to Storefront and available preview credits. Check your status in the Storefront dashboard.
- WordPress administrator access, or help from the person who manages your website's scripts.
The WooCommerce integration uses a script from the DecorViz dashboard. You can install it through your existing site-wide footer-code tool or a WordPress plugin that accepts HTML scripts.
First, create your storefront in DecorViz. Then copy its snippet into WordPress. After that, test the button on a live product page. The examples below show what to look for at each step.
1. Connect your WooCommerce store
Create your storefront
Sign in and open the DecorViz Storefront dashboard. On your first visit, you will see Create your storefront.
Enter your store domain
Enter only the website domain, for example yourstore.com. Leave out https:// and product-page paths such as /shop/blue-rug/.
Choose your platform setting
For a WooCommerce store, selecting WooCommerce makes DecorViz look for WooCommerce's product title, gallery image, and product details first. Auto detect also supports WooCommerce, so you can keep it if detection already works correctly. Leave Domain matching on Exact domain for a store that uses one hostname.
Click Create Storefront
Your storefront is now connected to that domain. If you already have a storefront, open Settings to review these values instead.
Create your storefront
Example screen. Enter your own store domain in the dashboard.
If your shop lives at shop.yourstore.com, enter that hostname. Review the domain-matching settings if you also serve product pages on other subdomains.
Enable Storefront and copy your snippet
Open the Settings tab. Make sure Enable storefront is switched on, then click Save changes. Scroll down to the Install snippet card and click Copy.
Install snippet
<script src="...auto-inject.js" data-key="..." async></script>CopyExample screen. The Install snippet card is below the settings and Save changes controls.
Copy from your dashboard, not from this guide. Your dashboard includes the correct install key automatically. The example below only shows the format.
<script
  src="https://decorviz.ai/runtime/storefront/v2/auto-inject.js"
  data-key="YOUR_INSTALL_KEY"
  async
></script>You only need Copy. Selecting Rotate key replaces the key and stops the old snippet from working.
2. Install the snippet in WordPress
Use a site-wide footer-code field so the script loads on your product pages. If your site already has a tool for this, paste the complete snippet there and save.
Add a footer-code plugin
Install and activate WPCode
In your WordPress admin, open Plugins → Add New Plugin. Search for WPCode - Insert Headers and Footers, select Install Now, then Activate. If WPCode is already active, continue to the next step.
Paste the snippet into Footer
Open Header & Footer
Go to Code Snippets → Header & Footer. Scroll to the Footer field.
Paste and save
Paste the complete snippet you copied from DecorViz into Footer, from <script to </script>. Keep any code already in the field and add DecorViz on a new line. Click Save Changes.
Code Snippets → Header & Footer
Header & Footer
<script
  src="https://decorviz.ai/runtime/storefront/v2/auto-inject.js"
  data-key="YOUR_INSTALL_KEY"
  async
></script>
Paste your own copied snippet here. Keep existing footer scripts.
Example screen. Field labels and layout may vary with the WPCode version.
Clear your website cache
If you use a WordPress caching plugin, clear or purge its cache. If your host or CDN also caches pages, clear that cache too. Then open a live product page in a private browser window to check the updated page.
WPCode provides global script fields for this purpose. See its official Header & Footer instructions for the current interface.
Use one installation method. The footer field accepts the full HTML snippet, including the opening and closing script tags. Product descriptions and individual page blocks are not site-wide installation locations.
If your developer manages installation
Ask them to add the dashboard snippet through your site's shared footer or WordPress footer hook so it loads on product pages. A plugin-based insertion survives theme changes; if the script lives in a theme, check installation again when changing themes.
3. Customize your room-preview button
Return to Settings in the DecorViz dashboard. Choose your button text, color, shape, and placement, then save. Use wording such as “See in Your Room” so shoppers know what to expect.
Button Placement & Appearance
Example settings. Choose the text and appearance that suit your store.
For a first test: start with Automatic (near Add to Cart). If your theme makes that position awkward, try Below the product image. Save and refresh your product page to see the change.
Review the excluded categories and the Products tab. If an eligible product should not offer room previews, disable it there. Start with the default detection settings and test before adjusting detection confidence.
Make sure Rugs & Carpets is not checked under Excluded Categories. Checked categories are excluded, so their products will not show the button.
Custom WooCommerce galleries and page builders can change where the button appears or which image is detected. Check placement on your own theme, including mobile pages.
4. Test a live product page
Use a product with a clear main photo, such as a rug, sofa, or chair. Open the public product URL that shoppers use, rather than a WordPress editor or preview link.
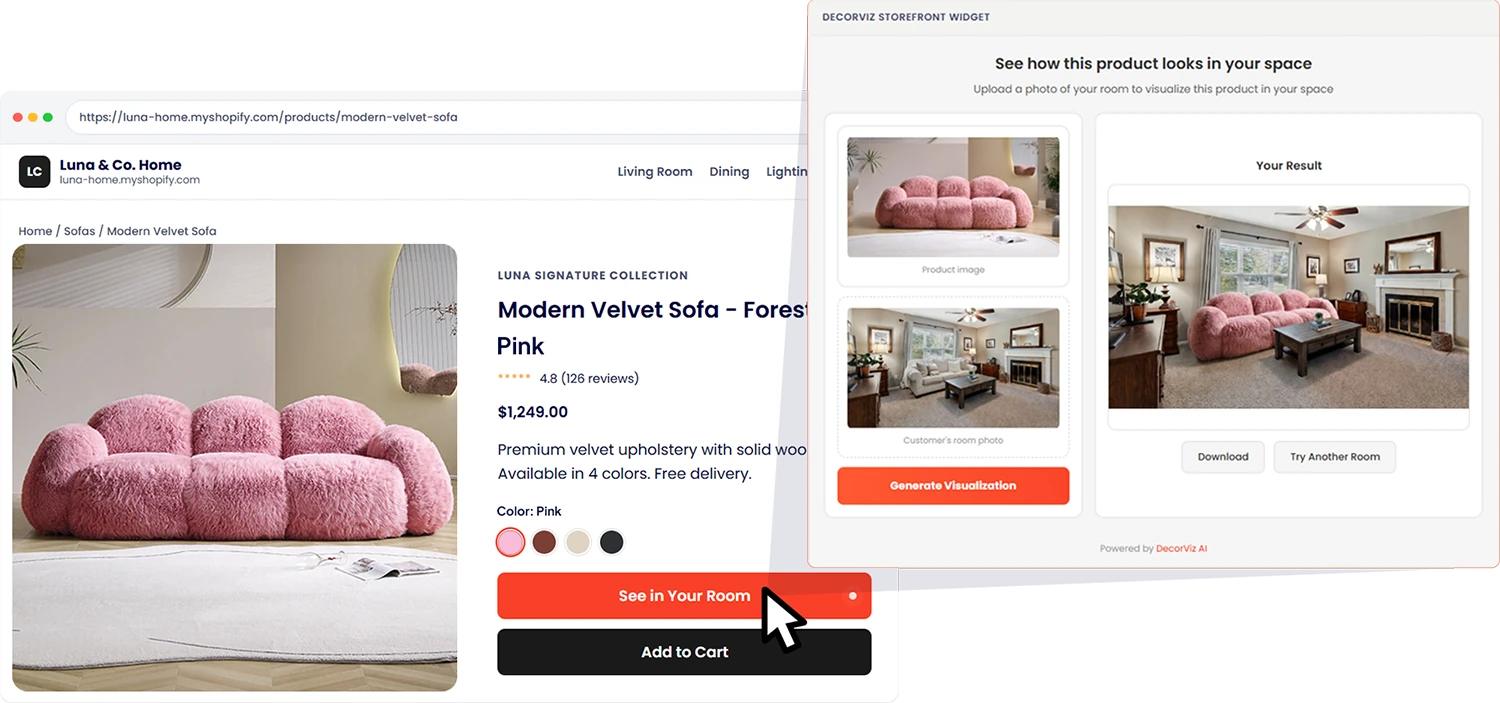
- Open a live furniture product page in a private browser window, using the hostname saved in DecorViz.
- Confirm that the preview button appears in the position you selected. Check both desktop and mobile.
- Open the widget and check that it uses the expected product photo. For products with variations, change the selection and verify the image before generating.
- Upload a room photo and generate a preview. This uses a preview credit.
- Check that the gallery, variation selection, and Add to Cart button still work.
- Open the Products tab in DecorViz and confirm the visited page is listed. Check a homepage or blog page too, where the product-preview button should not appear.
The button appears on the product page, the widget shows the correct product image, and a room preview generates successfully. Repeat the check on mobile before sharing it with shoppers.
A room preview helps shoppers judge appearance. Your product dimensions and clearance information remain the reference for fit.
Troubleshooting
The button does not appear
- Confirm the snippet is saved in the site-wide footer and contains your actual install key.
- In DecorViz Settings, confirm Enable storefront is on and click Save changes.
- Check that the live hostname matches your Storefront settings.
- Clear page and CDN caches, then reload in a private window.
- Check whether the product or its category is excluded in DecorViz.
- Check that the product name, short description, or product category names the item, such as rug, sofa, or lamp. DecorViz uses these words to recognize the product. If none of them appear on the page, add the word to the short description or category.
- If a performance plugin delays JavaScript until interaction, exclude the DecorViz runtime from that delay and test again.
The wrong image is selected, or the button is misplaced
Confirm the platform is set to WooCommerce and try another product page. Review the button-placement setting. If a custom gallery or page builder still causes trouble, contact DecorViz with the live product URL, your theme name, and the gallery or builder you use.
The widget opens, but a preview fails
Check your Storefront access and remaining credits. Try a clear room photo and confirm the product image loads. If the problem continues, send the product URL and the error message to support.
The button appears twice
Check whether the snippet was added in two places, such as WPCode and your theme's footer. Keep one installation, remove the duplicate, clear your caches, and reload.
You need help with your theme
Contact us with your live product-page URL, WordPress theme name, and a screenshot of the problem. Include any page-builder or product-gallery plugin you use so we can check the right layout.
Common questions
Do I need to configure every product?
No. The site-wide script detects supported product pages automatically. Review detected products and exclusions in the dashboard.
Do I need 3D models?
No. DecorViz uses the product photos already on your product pages and a room photo uploaded by the shopper.
Can I use a different WordPress script plugin?
Yes. Use a tool that accepts the full HTML snippet and inserts it site-wide on the public store. Check that the script reaches your product pages.
How do I remove Storefront?
Remove only the DecorViz script from the footer field or installation location, save, and clear your caches. The button will disappear once the updated pages are served.
What happens if I rotate my install key?
The old key stops working. Replace the installed snippet with the new dashboard snippet immediately, then clear caches and test again.
For more dashboard settings, see the general Storefront setup guide. For Shopify, use the Shopify app guide.
Connect your WooCommerce store
Get your install snippet and give shoppers a room-preview option on your product pages.