
Overview
DecorViz Storefront adds a "See in Your Room" button to your product pages automatically. You install it once, site-wide, and the runtime detects product pages on its own, pulls the product photo directly from the page, and places the button near your Add to Cart button.
This guide covers WooCommerce, Wix, Squarespace, and custom-coded sites: you configure Storefront in the DecorViz web dashboard and paste one script tag into a global template. There is no dashboard step for each product. Once the snippet is live, every product page on your store is covered.
For platform-specific steps, follow the WooCommerce Storefront Setup Guide or the Squarespace Storefront Setup Guide.
Shopify stores do not use the snippet. Install the DecorViz: Furniture Visualizer app from the Shopify App Store and follow the Shopify app setup guide instead.
Storefront is included with the Storefront plan. Go to Storefront to get started.
Prerequisites
Before you begin, make sure you have:
- Storefront Subscription: Storefront is only available on an active Storefront plan. Check your plan or upgrade if needed.
- An online store: Any ecommerce platform or website with product pages.
- Access to your theme or site code: You'll need to paste one script tag into a global template (theme file, footer, or code injection panel), not just a single page.
Storefront reads the product image straight from the page the shopper is viewing. As long as your product pages already show a clear photo of the item, there's nothing extra to upload.
Part 1: DecorViz Storefront Setup
Head to your DecorViz Storefront dashboard. In the app, it is also in the account menu at the top right. The menu on the left has four pages: Overview, Products, Appearance, and Settings.
Step 1: Create Your Storefront
Each DecorViz account can run one storefront at a time, tied to one website domain. The first time you visit, you'll be asked to create it.
Enter Your Domain
Type your store's domain without "https://" or a trailing slash, for example yourstore.com.
Choose a Platform
Pick Auto detect, Shopify, WooCommerce, Squarespace, or Generic / custom. Auto detect works for most stores and is the recommended starting point; you can change this later in Settings if detection needs tuning.
Set Domain Matching
Choose Exact domain if the button should only run on that one domain, or Include subdomains if you also serve product pages from subdomains (for example a separate shop.yourstore.com).
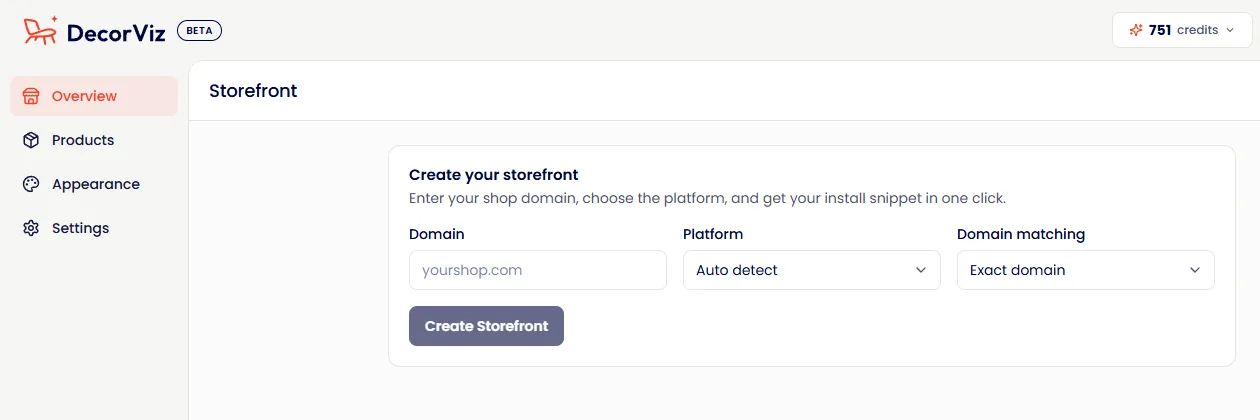
Each DecorViz account supports one storefront and one domain. If you need to enable visualization on a second website, you'll need a separate account.
Step 2: Configure Detection & Button
Product detection is on the Settings page, and the button's look and position are on the Appearance page. The defaults work well for most stores, but it's worth reviewing these before you go live.
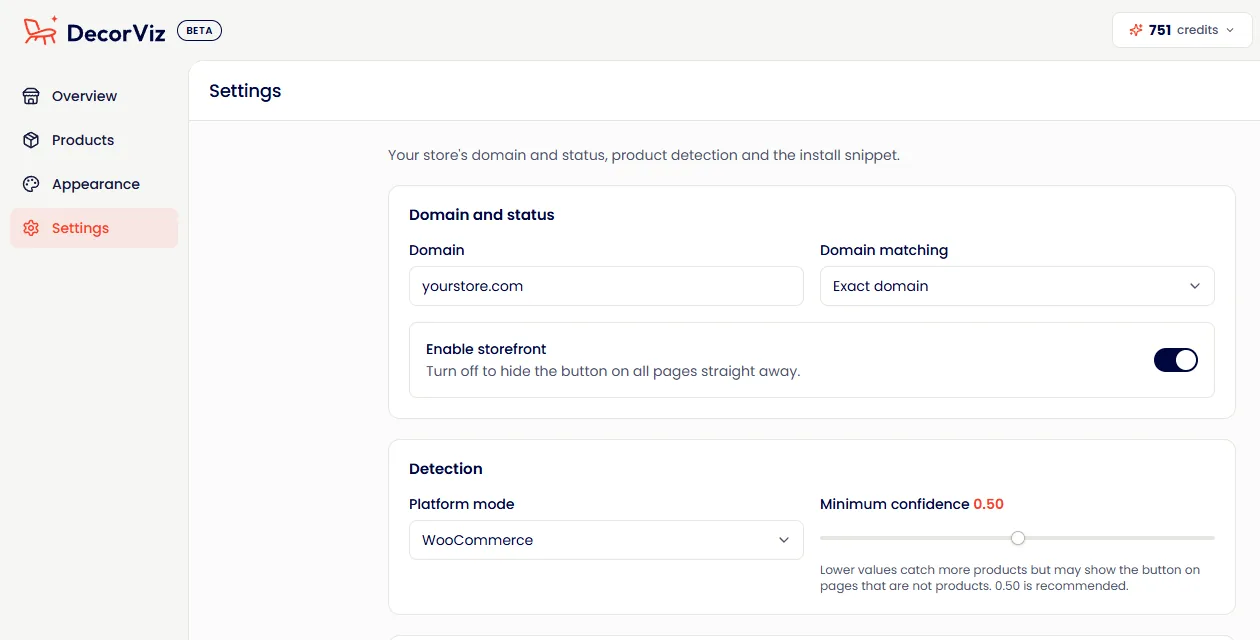
Detection Settings
On the Settings page, confirm the Platform mode matches your store (or leave it on Auto detect). Adjust Minimum confidence if needed: lower values catch more product pages but risk showing the button on non-product pages; higher values are stricter. 0.50 is the recommended default.
Button Look & Position
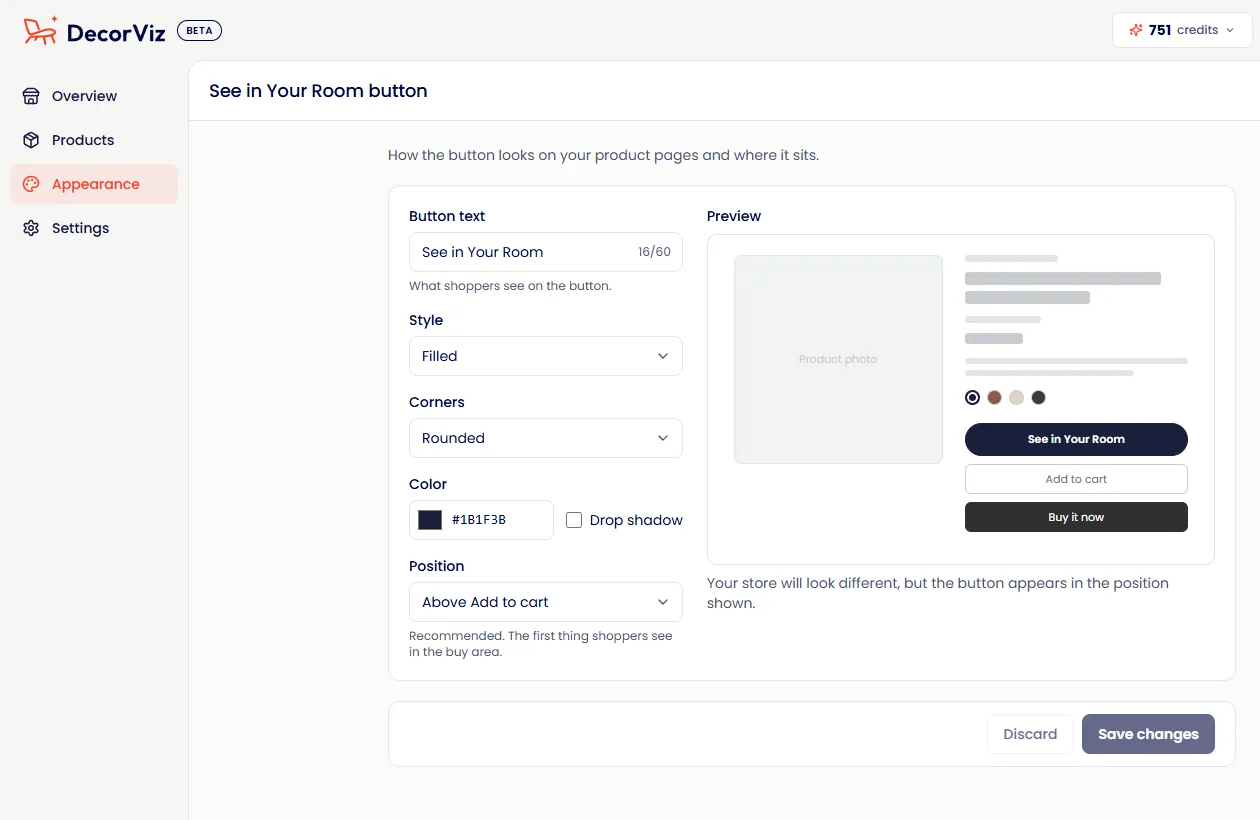
On the Appearance page, the Preview shows the button as you change it:
- Button text: what shoppers see on the button
- Style: Filled or Outline
- Corners: Rounded or Square
- Color, and a Drop shadow on or off
- Position: Above Add to cart (recommended), Below Add to cart, Below the product image, on the image (centred, bottom left, or bottom right), floating (bottom right or bottom left), or Custom position (advanced)
- With a custom position, enter a CSS selector and choose Place button: before, after, or inside that element
Click Save changes when you are done.
Step 3: Copy the Install Snippet
Once you've configured detection and button settings and saved, DecorViz generates a single install snippet tied to your account's install key and current configuration. This is the only code you need to add to your store.
Copy Your Snippet
On the Settings page, scroll down past Save changes to the Install snippet card and click Copy. You're now ready for Part 2.
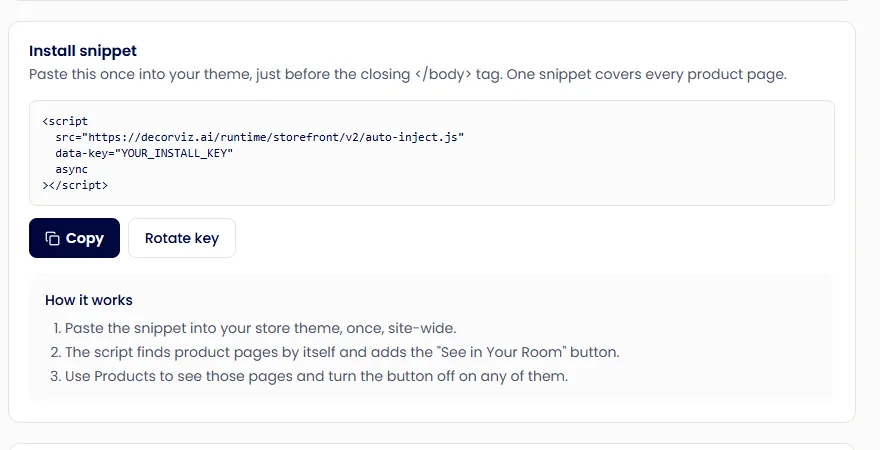
The Install snippet card also has a Rotate key button for security purposes. Rotating immediately invalidates the old key, so the button will stop appearing on your store until you update the snippet with the new key. Only rotate when you're ready to redeploy right away.
Part 2: Your Store Website Setup
Paste the snippet from Step 3 into your store once, in a place that loads on every page (a global theme file, footer, or code-injection panel). Do not place it on a single product page only, the runtime needs to run site-wide to detect and cover every product.
Shopify stores install the DecorViz: Furniture Visualizer app from the Shopify App Store instead of pasting a script, and configure everything inside Shopify admin rather than the web dashboard. Follow the Shopify app setup guide.
WooCommerce
WooCommerce runs on WordPress, so the snippet goes in your theme's global footer, not a single product.
Use a Header/Footer Plugin (Recommended)
Install a lightweight plugin such as "Insert Headers and Footers" or "WPCode." Paste the DecorViz snippet into the Footer scripts field and save. This keeps the snippet safe from theme updates.
Or Edit footer.php Directly
If you prefer editing theme files, go to Appearance → Theme File Editor, open footer.php, and paste the snippet just before the closing </body> tag. Use a child theme if you want the change to survive theme updates.
Code added here will be loaded just before the closing </body> tag, on every page of your site.
The button now appears on every WooCommerce product page, detected automatically using your product gallery image and Add to Cart button.
Wix, Squarespace & Other Platforms
The snippet is standard HTML. It works anywhere you can add custom code that loads on every page.
| Platform | How to add the snippet |
|---|---|
| Wix | In the Wix Editor, go to Settings → Custom Code, add new code, set it to load on all pages in the Body - end position, and paste the snippet. |
| Squarespace | Open Pages → Custom Code → Code Injection (or Website Tools on 7.0), paste the snippet into the site-wide Footer field, and save. An eligible Squarespace plan is required. Follow the Squarespace setup guide. |
| Webflow | Go to Project Settings → Custom Code → Footer Code, paste the snippet so it applies site-wide, and publish. |
| Custom HTML site | Add the snippet to the shared layout or template that every page includes, just before the closing </body> tag. |
| Other platforms | Look for a "custom code," "tracking scripts," or "footer code" option that applies globally, and paste the snippet there. |
Unlike a tracking pixel you might add to one landing page, this snippet needs to load on every product page. Use a global template, footer, or "all pages" code-injection setting, not a single-page embed.
Part 3: Manage Your Products
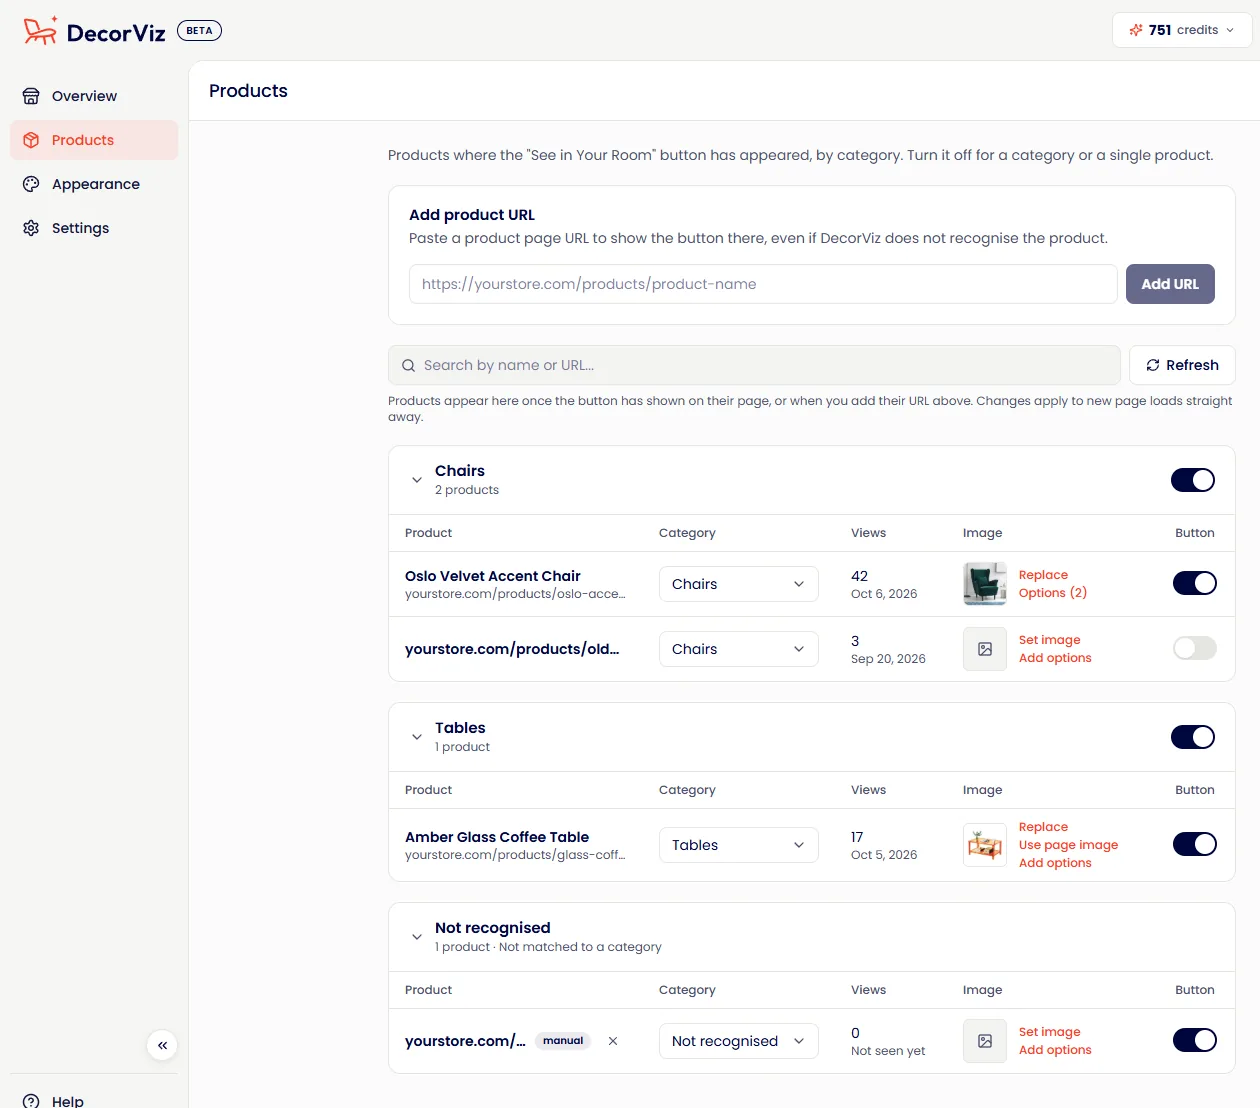
Once the snippet is live, open the Products page. It lists every product page where the button has appeared, grouped by category, with views, the last time it was seen, the product photo, and a Button switch. Changes apply on the next page load.
Turn the Button Off for a Page or a Category
- A single page: switch its Button off, for example for discontinued or out-of-stock items.
- A whole category: switch the category off to keep the button off all its products, including ones that appear later. Useful for gift cards, accessories, or spare parts.
Add a Product Page Yourself
To manage a page before a shopper has visited it, or one DecorViz does not recognize as a product, paste its URL into Add product URL at the top of the page and click Add URL. Refresh pulls the latest detected pages without reloading the dashboard.
Fix the Product Photo
The button uses the main photo from the product page. If DecorViz picked the wrong photo, or found none, click Replace (or Set image) under the product photo and upload the right one. Use page image goes back to the photo on the product page.
Product Options: Stains, Colors, and Fabrics
If a product comes in several wood stains, colors, or fabrics, add each one as an option so shoppers can see it in their own room. Click Add options under the product photo.
- The page photo always comes first. Add up to 10 more photos, one for each option (JPG, PNG, or WebP).
- Give each photo a name, such as Walnut or Emerald velvet. Names are optional; a photo without a name shows none.
- Use the arrows to set the order, then click Save.
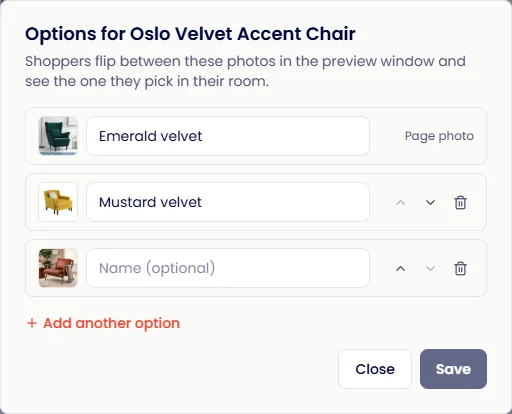
In the preview window, shoppers switch between the photos with the arrows, see each option's name, and generate the preview with the one they pick. Once a product has options, the link shows how many, for example Options (2).
A page only appears in the Products list once the button has actually been shown there. If you don't see a product you expect, visit that page yourself to trigger detection, or add the URL manually.
Testing Your Installation
After saving the snippet, verify everything is working before telling customers:
- Visit a few live product pages across different templates (a simple item, a variant-heavy item, and anything custom-built).
- Confirm the button appears in the expected spot with your chosen text, color, and style.
- Check the Products page to confirm those pages were detected and recorded.
- Run a full test generation: click the button, upload a room photo, and confirm the result renders correctly.
- Visit a non-product page (your homepage or a blog post) and confirm the button does not appear.
- Test on mobile. Many shoppers browse on their phones.
Make sure you're viewing the live store URL, not a staging site or a draft preview. Also confirm the domain in your Storefront settings matches your store's domain exactly (no https://, no trailing slash, and check the subdomain matching setting).
Troubleshooting
Button not appearing anywhere
- Confirm the snippet is in a global template (footer.php, site-wide code injection), not a single page
- Check that Enable storefront is on, on the Settings page
- Confirm the domain on the Settings page matches your live store domain exactly
- If you recently rotated your install key, make sure the live install uses the new key
- Clear your browser cache and reload the page
Button not appearing on a specific product page
- Lower the Minimum confidence setting slightly, or set Platform mode explicitly instead of Auto detect
- Check that the product's category isn't switched off on the Products page
- Check that the page wasn't switched off on the Products page
- If your theme is heavily customized, choose Custom position (advanced) on the Appearance page and enter a CSS selector
Button appears on non-product pages
- Raise the Minimum confidence setting
- Set Platform mode explicitly rather than Auto detect
Wrong or missing product image
- The runtime pulls the main product image directly from the page; confirm that image loads normally for shoppers (not lazy-loaded behind a click)
- If your theme uses an unusual image structure, contact support so we can review your gallery markup
Button appears but generation doesn't work
- Confirm your Storefront subscription is active
- Confirm you have previews remaining. Once the allowance runs out, the button still appears, but shoppers see a message that previews are temporarily unavailable instead of a generated preview
Contact our support team at [email protected] or use the chat in your DecorViz dashboard.
Frequently Asked Questions
Do I need to set up a widget for each product?
No. Storefront uses one site-wide snippet. The runtime detects product pages and the product image automatically, including new products you add after installing.
How many storefronts can I create?
One per DecorViz account, tied to one domain. If you run multiple stores, each needs its own account.
Can I hide the button on specific products?
Yes. Turn individual pages off on the Products page, or switch off a whole category (like rugs, lighting, or wall art) on the same page.
Can shoppers try different stains, colors, or fabrics?
Yes. On the Products page, click Add options under a product photo and add a photo for each stain, color, or fabric. Shoppers switch between them in the preview window and see the one they pick in their room.
What happens if I rotate my install key?
The old key stops working immediately. The button will disappear from your store until you update the live snippet with the new key, so only rotate when you're ready to redeploy right away.
Does it work on platforms other than WooCommerce?
Yes. Squarespace has its own detection setting. Generic detection covers many other ecommerce themes, including Wix, Webflow, and custom-coded sites, and you can set a custom CSS selector on the Appearance page if your theme needs precise placement.
I run a Shopify store. Can I use this guide?
No, and you do not need to. Shopify stores install the DecorViz app from the Shopify App Store rather than pasting a snippet, and configure the button inside Shopify admin. Follow the Shopify app setup guide.
Can merchants see shopper room photos?
No. Shopper room photos are used only to generate the preview. Merchants do not see, browse, or download those room photos from the Storefront dashboard.
Does it use my visualization credits?
Yes, each visualization a shopper completes uses credits from your Storefront plan allowance.
Will this slow down my store?
The script loads asynchronously, so it does not block your page from rendering.
Ready to Get Started?
Install Storefront once and let DecorViz handle product detection across your entire store.